一、概述
近年來,電腦視覺(Computer Vision) 領域迎來了重大改革,從過去一個一個從像素處理(Pixel) 的方式,已經轉變成由「大數據(Big Data)」來統計出所謂「模組(Model) 」的 深度學習(Deep Learning) 應用方式。更何況是顛覆人類想像的生成式 AI ( Generative AI ) 與 ChatGPT 、可說是 人工智能(Artificial Intelligence) 的時代已經全面來臨,讓周邊的設備智能化已經不是遙不可及的夢想 !! 然而,過去無數學者、研究員、工程師致力研發的系統,現今僅須透過一些簡單的方法就能輕鬆實現。而現今各大廠牌的 神經網路處理器(Neural Processing Unit, NPU) 普遍配置約 1 至 5 TOPS,但仍有一些高算力高精準度的應用場景需求,因此這裡將介紹以恩智浦 NXP 的 i.MX 8MQ 平台搭載 Hailo-8 AI 晶片 (26 TOPS) ,即可將 SoC 升級並實現成 AI 的終端產品!! 且一同貫徹「邊緣運算(Edge Computing)」的理念,來達成更及時、精準的運算效益 !!
如何建立 NXP 嵌入式系統的開發環境, 讀者可以閱讀此 【ATU Book - i.MX8系列 - OS】NXP i.MX Linux BSP 開發環境架設 來快速佈署恩智浦 NXP i.MX8 系列的開發環境,透過此博文或 ATU 一部小編的系列博文,即可輕鬆實現任何有關 i.MX8 的環境架設 !! 或是想要更快速進入到 NXP 平台的實作中,可以至官方網站下載官方發行的 Linux 映像檔(Image)。
Note : 目前作者測試的版本為 BSP L5.15.52-2.1.0 ( kirkstone )
Embedded Linux for i.MX Applications Processors | NXP Semiconductors

NXP i.MX8MQ 與 Hailo-8 架構示意圖
然而,本篇文章將會以 NXP i.MX8MQ 系統晶片與 Hailo-8 AI 晶片一同搭配作為 高算力的邊緣運算平台 ,並配上 Hailo TAPPAS 的範例程式 與 Hailo Model zoo 模組直接部屬至模型,來呈現 Hailo-8 的效能表現 !! 請跟隨作者的腳步,一同窺探全球最知名的系統晶片與 AI 晶片的魅力所在吧 !!
二、平台資源介紹
(1) NXP i.MX8MQ 平台
恩智浦半導體是全球前十大的半導體公司,主要提供半導體、系統解決方案和軟體,並致力用於智能工廠(Smart Factory)、智能醫療(Smart Medical)、智慧生活(Smart Life)、智慧城市(Smart City)、物聯網(IoT)、工業 4.0、先進輔助駕駛系統(ADAS) 的 i.MX8M 系列平台,其搭載4顆Arm Cortex-A53 處理器,並擁有非常強大的 IO 支援,且可配合 Hailo AI 加速晶片來加速落實 AI 智慧於人們的生活中。
核心技術優勢:
- 強大的處理器配置。搭配 4 顆 Arm Cortex-A53 處理器與 1 顆 Cortex-M4F。
- 豐富的 I / O 支援,能夠提供齊全的周邊配置。如高畫質多媒體介面(HDMI)、低壓差分訊號技術介面(LVDS)、乙太網路(Ethernet)、控制器區域網路(CAN bus)、非同步收發傳輸器(UART)、通用序列匯流排接口(USB Type A/C)、5 mm headset 音源接口、鏡頭資料傳輸介面(MIPI-CSI)、顯示資料傳輸介面(MIPI-DSI)、M.2 - PCIe 3.0 傳輸介面(2lane)。
- 可快速上手應用 eIQ / PyeIQ 機器學習開發環境,提供 TensorFlow Lite、ONNX、DeepViewRT 等多種深度學習框架的應用範例。
(2) Hailo-8 AI 晶片
Hailo 成立於 2017 年,總部位於以色列的特拉維夫,受 CBlight 評選而榮獲 2020 年的全球最具特色的十家AI晶片新創業者之一,適用於智慧工廠、智能城市、智能交通系統(ITS)、工業 4.0 、智慧零售等等廣泛應用。而主要產品 Hailo-8 是一個高階的 AI 晶片,具有低功耗、高運算能力、高跨平台整合性等等優勢,並提供豐富的模組資源與整合套件,能讓用戶體驗更完善的 AI 資源整合,如下圖所示。

Hailo-8 晶片介紹示意圖
Hailo 提供下列 M.2 PCle 與 Mini PCIe 兩種產品介面,其中 M.2 Module 可細分成三種接口,依序為 M Key、B+M Key、A+M Key ; 推理流程以 PCIe 傳輸方式,將 神經網路(Neural Network) 與 輸入資料(Input Data) 送至 AI 晶片進行推理,並將完成後的資訊送回平台進行後續的展示處理。這裡以 NXP i.MX8MQ EVK 搭配 Hailo-8 A+E Key PCIe 介面來展示其應用。
Note : PCI Express2X(單通道)傳輸速度約 1GB/S、USB 3.0 傳輸速度約 500MB/s

Hailo-8 PCIe 硬體介紹
來源出處 : 官方網站
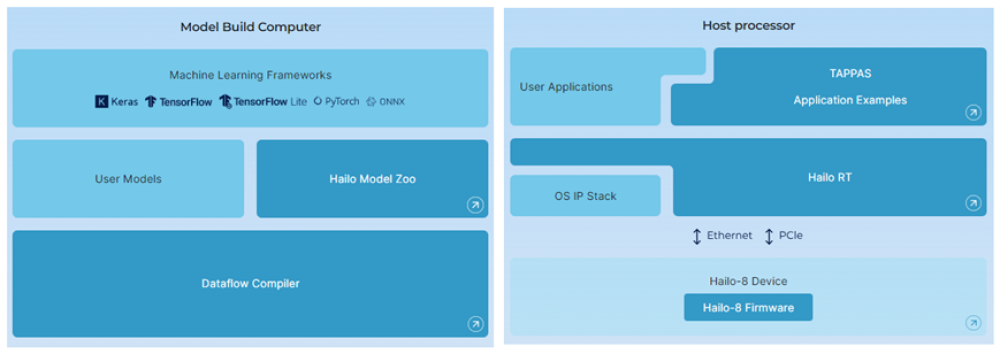
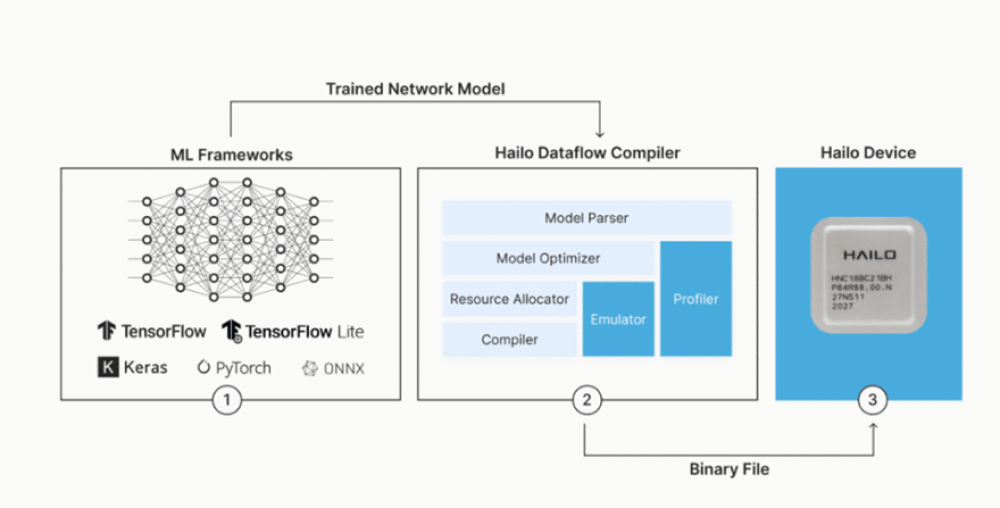
同時,Hailo 亦提供豐富且完善的軟體資源,如下圖所示 ; 左側是 PC 端,主要目的是「編譯 Hailo模型 (.hef) 」,可以支援 Keras、Tensorflow、Pytorch、ONNX 等等熱門機器學習框架,並藉由 Dataflow Compiler 工具 來進一步優化成硬體最佳的部屬模型,或是直接透過 Hailo Model Zoo 來快速驗證各模組效益為何。另外一側 (右側),是用晶片的開發環境上,其目的自然是「部屬 Hailo 模型」所需的套件,如 Hailo-8 Firmware 、Hailo RT 與 TAPPAS ; 其中 HailoRT 將會提供許多 C 與 Python 的 應用程序介面 API ,以及 Command 指令來幫助開發者,快速部屬模型至 Hailo-8 的晶片上。 至於 TAPPAS 則是直接提供一系列的範例程式,僅需一行指令,即可讓開發者直接見識到 Hailo 晶片應用效益 !!

Hailo 軟體框架示意圖
來源出處 : 官方網站

Dataflow Compiler 工具之示意圖
來源出處 : 官方網站
三、快速環境架設
1. Yocto BSP 必要軟體安裝
(1) 安裝必要套件 :
$ sudo apt-get upgrade
(2) 安裝必要套件 :
$ sudo apt-get install gawk wget git-core diffstat \
  unzip texinfo gcc-multilib build-essential chrpath \
  socat cpio python python3 python3-pip python3-pexpect \
  xz-utils debianutils iputils-ping python3-git python3-jinja2 \
  libegl1-mesa libsdl1.2-dev pylint3 xterm curl repo \
  zstd liblz4-tool dkms linux-headers-generic linux-headers-5.15.0-57-generic
Note : 套件 dkms , linux-headers-generic linux-headers-5.15.0-57-generic 為 Hailo 所需套件
(3) 下載 DataBase :
$ git config --global user.name "user name"
$ git config --global user.email "user.name@wpi-group.com"
Note : 須自行更新為相應的字串,例如 : user name 須改為 weilly.li
(4) 設置 repo環境 :
$ cd ~
$ mkdir ~/bin
$ curl http://commondatastorage.googleapis.com/git-repo-downloads/repo > ~/bin/repo
$ chmod a+x ~ /bin/repo
$ export PATH=~/bin:$PATH
2. Yocto BSP 編譯開發環境
本篇將使用 最新版本 與 NXP i.MX8MQ 平台來演示如何『架設 Yocto BSP 環境』。 讀者僅需要準備一台電腦以及容量保留 500GB 以上的 Ubuntu OS 20.02 系統,並跟著下列步驟,即可輕鬆架設編譯環境以及產生映像檔(Image)。
(1) 建立資料夾,並移動至該資料夾中 :
$ cd <root/anywhere>
$ mkdir <Yocto Project>
$ cd <Yocto Project>(2) 以 repo 套件下載與同步指定 BSP 版本之存儲庫 :
$ repo init -u https://github.com/nxp-imx/imx-manifest -b imx-linux-kirkstone -m imx-5.15.52-2.1.0.xml
$ repo sync
(3) BSP 環境設定 ( 以 i.MX 8MQ 為例 ) :
$ EULA=1 MACHINE=imx8mqevk DISTRO=fsl-imx-xwayland
$ source ./imx-setup-release.sh -b buildxwayland
(4) 請下載 Hailo軟體代碼 至 <Yocto>/source 底下 :
$ cd <Yocto folder>/sources
$ git clone https://github.com/hailo-ai/meta-hailo
$ cd meta-hailo/
$ git checkout kirkstone
(5) 修改 bblayers.conf , local.conf , imx8mq-evk.dts 三個檔案
● 請修改 <Yocto folder >/conf/bblayers.conf :
$ cd <Yocto folder>/buildxwayland/
$ vi conf/bblayers.conf-> 於 bblayers.conf 添加下列子層級
BBLAYERS += "${BSPDIR}/sources/meta-hailo/meta-hailo-accelerator"
BBLAYERS += "${BSPDIR}/sources/meta-hailo/meta-hailo-libhailort"
BBLAYERS += "${BSPDIR}/sources/meta-hailo/meta-hailo-tappas"
● 請修改 <Yocto folder >/conf/local.conf :
$ cd <Yocto folder>/buildxwayland/
$ vi conf/local.conf
-> 於 local.conf 添加下列套件
IMAGE_INSTALL:append = "libhailort hailortcli pyhailort libgsthailo hailo-pci hailo-firmware tappas-apps hailo-post-processes libgsthailotools "
● 請修改 imx8mq-evk.dts :
更改 PCIE GPIO 腳位資訊,讓電位能夠達到 3.3 V。
$ cd <Yocto>/tmp/work-shared/imx8mqevk/kernel-source/arch/arm64/boot/dts/freescale
$ vi imx8mq-evk.dts
-> 於 imx8mq-evk.dts 修改如下 :
&pcie1 {
	pinctrl-names = "default";
	pinctrl-0 = <&pinctrl_pcie1>;
	disable-gpio = <&gpio5 10 GPIO_ACTIVE_LOW>;
	reset-gpio = <&gpio5 12 GPIO_ACTIVE_LOW>;
	clocks = <&clk IMX8MQ_CLK_PCIE2_ROOT>,
		 <&clk IMX8MQ_CLK_PCIE2_AUX>,
		 <&clk IMX8MQ_CLK_PCIE2_PHY>,
		 <&pcie1_refclk>;
	clock-names = "pcie", "pcie_aux", "pcie_phy", "pcie_bus";
	assigned-clocks = <&clk IMX8MQ_CLK_PCIE2_AUX>,
			  <&clk IMX8MQ_CLK_PCIE1_PHY>,
			  <&clk IMX8MQ_CLK_PCIE1_CTRL>;
	assigned-clock-rates = <10000000>, <100000000>, <250000000>;
	assigned-clock-parents = <&clk IMX8MQ_SYS2_PLL_50M>,
				 <&clk IMX8MQ_SYS2_PLL_100M>,
				 <&clk IMX8MQ_SYS2_PLL_250M>;
	vph-supply = <&vgen5_reg>;
	l1ss-disabled;
	status = "okay";

	hailo_host {
		compatible = "hailo,hm218b1c2lae";
	};

};
(6) BSP 編譯 :
$ bitbake imx-image-full
3. Yocto BSP 燒錄方式
燒錄映像檔(Image) 至 NXP 嵌入式的平台方法有很多種,建議主要有三種方式,分別為 Linux 指令燒錄方式、UUU 燒錄軟體、第三方燒錄軟體。順帶一提,目前 NXP 所採用的映像檔格式為 wic 檔案,請至開發環境中的 <YOCTO>/tmp/deploy/images/imx8mqevk 查看是否有 .wic 或 .wic.zst 檔案 ! 此範例以 SD Card 作為儲存裝置的燒錄方式為主,若欲了解其他儲存裝置,請參考 UUU 的操作方式。

燒錄前,請確認 Boot Switch 開關撥片位置是否正確。如下圖,若欲使用 eMMC 方式開機則須設置至 0010 ,反之 SD Card 方式開機則須設定至 0011。
並使用下列指令,完成「解壓縮」即可生成「.wic」檔案
$ zstd -d <image.wic.zst> PS : 詳細 Boot Switch模式切換,請參考 i.MX_Linux_Users_Guide 4.5.11 章節
以 「.wic」檔案 燒錄至 SD
(1) Linux 指令
請將 SD Card 連接至 PC 端 (Linux 環境),並確認所在的路徑位置
$ ls /dev/sd*燒錄 Image 檔至 SD Card 中 :
$ export DEVSD=/dev/sdb
$ cd  <Yocto Project>/buildxwayland/tmp/deploy/images/imx8mqevk
$ bunzip2 -dk -f imx-image-full-imx8mqevk -*.rootfs.wic.zst
$ sudo dd if=imx-image-full-imx8mqevk -*.rootfs.wic of=${DEVSD} bs=1M && sync
(2) 第三方燒錄軟體
下載 Rufs 燒錄軟體,點進「選擇」後,選取「所有檔案」選擇 wic 檔案 ! 即可按下「執行」!

四、Hailo-8 AI Chip 使用方式
本篇將結合 NXP i.MX8MQ 平台與 Hailo-8晶片來實現 AI 應用,請將其晶片連接平台後,操作以下步驟 :
1. Hailo-8 驗證裝置
(1) 使用 lspci 來查看是否成功連接裝置 :
$ lspci
(2) 使用 HailoRT-CLI 套件來驗證裝置是否啟用 :
$ hailortcli fw-control identify 
2. HailoRT Command Line Tools 快速使用
官方提供 HailoRT 4.10.0 Command Line Tools - Hailortclit 套件,讓開發者可以快速進行認證裝置、掃描裝置、Senosr 設定、推理、Benchmark、測量功耗 等等應用。
(1) 使用 HailoRT-CLI 套件 :
$ hailortcli -help
(2) 使用 HailoRT-CLI 快速進行掃描裝置 :
$ hailortcli scan
(3) 使用 HailoRT-CLI 快速進行模組推理 :
$ hailortcli run mobilenet_v1.hef
(4) 使用 HailoRT-CLI 套件執行 Benchmark 檢測效能 :
$ hailortcli benchmark mobilenet_v1.hef
(5) 使用 HailoRT-CLI 套件測量功耗 :
$ hailortcli measure-power
(6) 使用 HailoRT-CLI 套件可允許產出 Log 檔案,但僅限 PCI 介面 :
$ hailortcli fw-logger fw_logs.txt –overwrite(7) 使用 HailoRT-CLI 套件來修改韌體配置 :
$ hailortcli fw-config read --target pcie --output-file config.json$ hailortcli fw-config write --target pcie config.json
(8) 使用 HailoRT-CLI 套件來升級韌體配置 :
$ hailortcli fw-update --target eth --ip 1.2.3.4 ./hailo_firmware.bin(9) 使用 HailoRT-CLI 套件來重置硬體 :
$ hailortcli fw-control reset --reset-type chip
$ hailortcli fw-control reset --reset-type nn_core
$ hailortcli fw-control reset --reset-type soft
$ hailortcli fw-control reset --reset-type forced_soft(10) 使用 HailoRT-CLI 套件來產出 Runtime Profiler 檔案 :
$ hailortcli run mobilenet_v1.hef collect-runtime-data
查看各架構層建置與運行等資訊…
$ vi hailort.log 
五、Hailo TAPPAS 展示 DEMO
TAPPAS 3.21.0 為官方所提供的 DEMO 範例,其應用如下
Note : SDK 4.10.0 已移除大部分範例, 刪除線標示 (部分結果由舊版本的 i.MX8MP 展示)
(1) 物件偵測(Objection Dectecion)
運行範例 :
$ ./apps/detection/detection.sh--input is an optional flag, path to the video camera used (default is /dev/video2).
--show-fps is an optional flag that enables printing FPS on screen.
--print-gst-launch is a flag that prints the ready gst-launch command without running it.

(2) 肢體偵測(Pose Estimation)
運行範例 :
$ ./apps/pose_estimation/pose_estimation.sh--input is an optional flag, path to the video camera used (default is /dev/video2).
--show-fps is an optional flag that enables printing FPS on screen.
--network Set network to use. choose from [centerpose, centerpose_416], default is centerpose.
--print-gst-launch is a flag that prints the ready gst-launch command without running it.

(3) 物件分割(Objection Segmentaion)
運行範例 :
$ ./apps/segmentation/semantic_segmentation.sh--input is an optional flag, path to the video camera used (default is /dev/video2).
--show-fps is an optional flag that enables printing FPS on screen.
--print-gst-launch is a flag that prints the ready gst-launch command without running it.

(4) 人臉偵測與面網(Facial Landmark)
運行範例 :
$ ./apps/cascading_networks/face_detection_and_landmarks.sh--input is an optional flag, path to the video camera used (default is /dev/video2).
--show-fps is an optional flag that enables printing FPS on screen.
--print-gst-launch is a flag that prints the ready gst-launch command without running it.

六、Hailo GStreamer Plugin 使用方式
Hailo Tappas是透過 GStreamer Pipeline 的方式來作應用。而所謂的 GStearmer 是一個跨平台的多媒體框架,工程師可以透過此框架達成各種多媒體應用,比如音訊回放、影片播放、串流媒體、鏡頭解析等等。
其設計理念是以 管道(Pipeline) 的方式來對每一個 元素(Element) 或 插件(Plugins) 進行串聯 ; 如下圖所述,若要透過 GStreamer 來解析一個 視頻檔案(mp4) 的話,基本的動作流程就是載入檔案、解析檔案、再分別解析音訊與視訊,最後將資訊傳送至 autoaudiosink 之中,就可以播放視頻了 !! 這整個流程就是所謂的 Pipeline 概念,以一種流水方式,一項接一項的進行操作 ; 其中淺藍色的區塊稱作元素(Element),通常是指一項動作或一個功能。而深藍色的區塊是稱作 Pad ,泛指一個接口的意思 ; 且接收端稱作 sink ,發送端稱作 src 。

GStreamer Pipeline 的實現方式相當直覺 !! 架設鏡頭後,僅需要 開啟終端機 輸入下方的指令,即可快速實現 !!
(1) 檢查當前裝置
$ v4l2-ctl --list-devices
(2) 檢查裝置的輸入格式
$ v4l2-ctl -d /dev/video3 --list-formats-ext
(3) 啟用攝像頭或鏡頭
$ gst-launch-1.0 v4l2src device=/dev/video3 ! video/x-raw,format=YUY2,width=1280,height=720 ! fpsdisplaysink 
延續上述概念,而 Hailo 則是巧妙的應用在 GStreamer 的元素(Element) 上,讓整個 AI的應用變成相當靈活。如下圖所示,僅須要先前完成編譯模組(Compile Model) 的動作,亦指取得 Hef 模組 ; 可透過官方所提供的 Dataflow Compiler 工具,將 TensorFlow / ONNX 的模組轉換成 Hailo 專用的模組格式。或是直接去官方所提供的 Model Zoo 下載範例模組來運行。隨後,即可 應用(Application GStreamer Pipeline) 來快速實現範例,如下 :
Note : 作者是從 Hailo Model Zoo 下載模組進行測試。

Hailo GStreamer Pipeline 示意圖
實現範例
(1) 物件偵測(Object Detection) – YOLOv5m
運行代碼 :
gst-launch-1.0 --no-position v4l2src device=/dev/video0 ! \
video/x-raw,width=1280,height=720 ! videoconvert ! \
queue leaky=downstream max-size-buffers=5 max-size-bytes=0 max-size-time=0 ! \
hailonet hef-path=/home/root/apps/detection/resources/yolov5m_yuv.hef is-active=true ! \
queue leaky=no max-size-buffers=30 max-size-bytes=0 max-size-time=0 ! \
hailofilter function-name=yolov5 config-path=/home/root/apps/detection/resources/configs/yolov5.json \
so-path=/usr/lib/hailo-post-processes/libyolo_post.so qos=false ! \
queue leaky=no max-size-buffers=30 max-size-bytes=0 max-size-time=0 ! \
hailooverlay ! queue leaky=downstream max-size-buffers=5 max-size-bytes=0 max-size-time=0 ! \
videoconvert ! fpsdisplaysink video-sink=autovideosink name=hailo_display
運行結果 ( HailoRT 顯示 FPS 約 102.78 張 ) :

(2) 物件偵測(Object Detection) – SSD MobileNet V1
運行代碼 :
gst-launch-1.0 v4l2src device=/dev/video1 ! \
videoscale ! video/x-raw,width=300,height=300 ! videoconvert ! \
queue leaky=downstream max-size-buffers=5 max-size-bytes=0 max-size-time=0 ! \
hailonet hef-path=/home/root/Version_2.5/ObjectDetection/COCO/ssd_mobilenet_v1.hef is-active=true ! \
hailofilter config-path=/home/root/Version_2.5/ObjectDetection/COCO/coco_labels.txt \
so-path=/usr/lib/hailo-post-processes/libmobilenet_ssd_post.so qos=false ! \
queue leaky=no max-size-buffers=30 max-size-bytes=0 max-size-time=0 ! \
hailooverlay ! queue leaky=downstream max-size-buffers=5 max-size-bytes=0 max-size-time=0 ! \
videoconvert ! fpsdisplaysink video-sink=autovideosink name=hailo_display
運行結果 ( HailoRT 顯示 FPS 約 102.78 張 ) :

七、結語
近年無數學者、研究員與業者致力於研究物件偵測相關的應用,如今僅需要利用簡單幾個步驟就完成一個簡單的『 YOLOv5 物件識別 』,且僅需短短幾個小時即可訓練出模型,相比與過去實在天壤之别。因此如何部屬至各個硬體平台端就是『落地的關鍵指標之一』,本篇文章以『 NXP i.MX 8MQ 』結合 『 Hailo-8 』 作為實現邊緣運算的裝置,讓本身沒有 NPU 的平台,能夠以 M.2 PCIe 介面來擴充平台的 AI 能力,來展現 Hailo 高算力的效能表現 ; 如上述結果而論,運行於 Yolov5m (1280x720) 模型能夠保持在每秒 102 張的處理能力、運行於 MobileNet-SSD (300x300) 模型則高達每秒 924 張的處理能力,綜合兩個結果,此性能表現可說是相當優異。同時,Hailo 也有提供豐富的TAPPAS 軟體應用範例,幫助開發者可以快速上手 AI 的應用! 若是習慣用 GStreamer 的開發者,亦有提供相對應的插件,讓開發者可以快速部屬模型 !! 可說是給予相當完善用戶的體驗 ! 如果有提升算力需求或是欲添加 AI 能力的平台,不妨試試看 Hailo 的 AI 晶片 ! 最後,對技術移植感興趣的讀者,可以持續關注 ATU 一部小編的系列博文 或是直接聯繫 ATU 團隊 ! 謝謝 !!
五、參考文件
[1] i.MX 8 Series Applications Processors Multicore Arm® Cortex® Processors
[2] NXP Document - i.MX Yocto Project User's Guide
[3] Welcome to the Yocto Project Documentation
[4] NXP Document - i.MX Linux Release Note
[5] NXP Document - i.MX Machine Learning User's Guide
如有任何相關 Machine Learning 技術問題,歡迎至博文底下留言提問 !!
接下來還會分享更多 Machine Learning的技術文章 !!敬請期待 【ATU Book-i.MX系列 - ML】 !!

評論